A digital paperclip doesn’t automatically look like it’s holding anything. If you simply place one on top of a stack of papers, the result can look like the clip is sitting on the page rather than actually gripping it.
The solution is to treat the paperclip much like you would treat a real one. Some of it needs to be visible, some of it needs to disappear behind the paper, and the shadow needs to follow the same arrangement.
PaintShop Pro’s layers make this fairly easy to accomplish. Once you separate the pieces that need to move behind the paper, you can reposition the whole clip without permanently damaging the original element.
Start by getting the paperclip ready
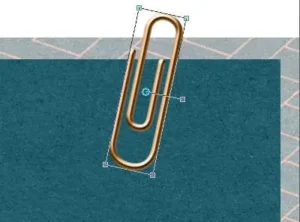
Place the paperclip where you think you want it and decide on its angle before doing the more detailed work.
There is another detail worth checking at this stage: the direction of the light.
Look at the highlights and darker areas of your paperclip. They tell you which direction the light appears to be coming from. If that doesn’t agree with the lighting you’ve used elsewhere on your project, the paperclip can look out of place even if everything else is correct.
In my example, I need to mirror the paperclip horizontally so its lighting agrees with the rest of the page.
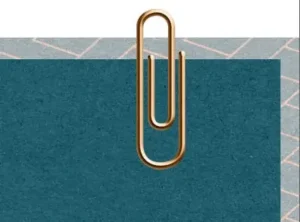
After mirroring the element, use the Pick tool to rotate it into the position you want.
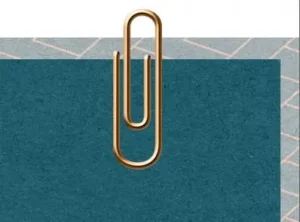
The clip should extend far enough over the papers that it looks as though it could actually be holding them together.
Keep the shadow separate
Before we start dividing the paperclip into sections, create its shadow.
This is one of those situations where it makes sense to do the shadow earlier than you normally would. We’re going to separate the shadow in exactly the same way as the paperclip, so having it ready now saves some work later.
Place the shadow on a separate layer rather than leaving it attached to the paperclip layer.
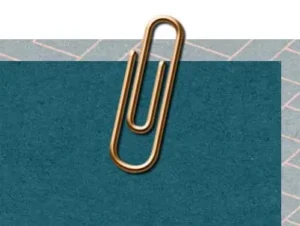
Don’t permanently erase the hidden section
At this point, you might be tempted to grab the Eraser tool and remove the portion of the paperclip that should disappear behind the paper.
That’s certainly one way to get the appearance you’re after, but it creates a problem if you later decide the paperclip needs to move.
Instead of destroying that section, we’ll put it on another layer. This gives us the flexibility to move the pieces around later.
Separate the part that goes behind the paper
We need to identify the portion of the paperclip that will be hidden.
You can make a point-to-point selection manually, but Edit Selection gives you a convenient way to see and paint the area you want.
You can activate Edit Selection from the Layers palette or from Selections > Edit Selection.
Once it is active, the selection appears as a black overlay. Choose the Brush tool and use white to paint over the section of the paperclip that should eventually sit behind the paper.
Don’t worry about making the selection follow the paperclip perfectly at the outer edge. In fact, it’s useful to extend it just a little beyond the edge of the paper. Just watch the other parts of the clip carefully so you don’t include anything that should remain visible.
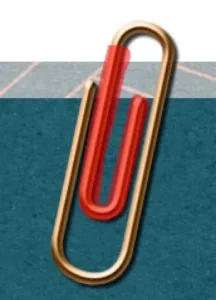
When you’ve finished painting the area, turn Edit Selection off.
The area you painted is now an actual selection.
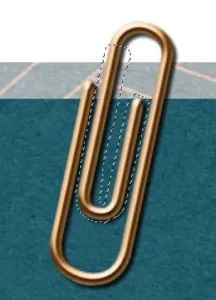
Now right-click the paperclip layer in the Layers palette and select Promote Selection to a Layer.
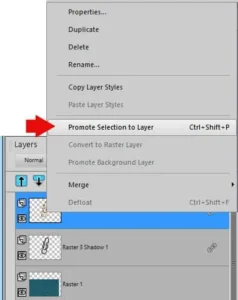
The selected section is now independent from the rest of the paperclip.
Go back to the original paperclip layer and press Delete. This removes the selected section from the original layer while leaving the promoted copy safely on its own layer.
Press Ctrl+D to remove the selection.
The important difference here is that we haven’t simply thrown away the part we don’t want to see. We’ve separated it so that we can control where it appears in the layer stack.
Give the shadow the same treatment
The shadow needs to follow the paperclip, so we need to divide it too.
If necessary, temporarily hide the paperclip layers so you can see the shadow clearly.
Use Edit Selection and the Brush tool to mark the part of the shadow that should disappear behind the paper. Turn Edit Selection off to convert the painted area into a selection.
Then use Promote Selection to a Layer on the shadow layer.
Return to the original shadow layer, press Delete, and deselect.
Pay particular attention to the size of this selection. The area removed from the shadow should correspond to the area removed from the paperclip. If the shadow selection extends farther than the paperclip selection, an unwanted strip of shadow may appear later.
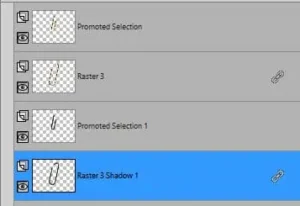
At this point, the paperclip should be represented by four layers:
- the main paperclip;
- the separated section of the paperclip;
- the main shadow;
- the separated section of the shadow.
Make the four pieces move as one
We’ve created separate layers so we can control the stacking order, but we don’t want those pieces wandering away from one another.
Link the four layers together.
Hold Ctrl while selecting all four layers, then click the Link icon at the top of the Layers palette.
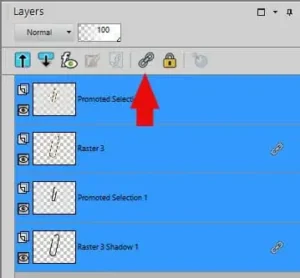
If you’re using an older version of PaintShop Pro, the linking controls may appear in a column on the right side of the Layers palette. You’ll see a link icon with a number or “None.” Set all four layers to the same link number.
Now you can move the paperclip without having to realign its separate pieces.
Let the paperclip pass through the layers
Here’s where the effect really comes together.
The small section of paperclip that we separated earlier needs to be moved below the paper it is supposed to be holding.
Click that promoted paperclip section and drag it downward in the Layers palette until it sits beneath the appropriate paper or element.
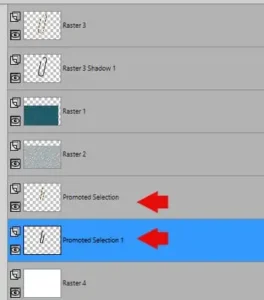
You may need to move it down several layers depending on how your project is arranged.
The result should be that one portion of the paperclip remains visible on top while another portion disappears behind the paper. The corresponding shadow needs to be positioned below the appropriate paperclip section as well.
Because the four layers are linked, you can now make small adjustments to the paperclip’s position without having to move each piece separately.
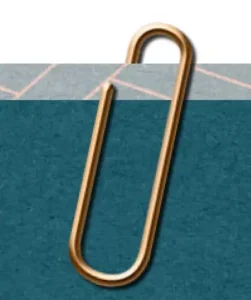
This is the part that makes the technique much more flexible than simply erasing the hidden area.
Cleaning up an unwanted shadow
There is one little problem you may run into.
You might move everything into place and discover a tiny piece of shadow showing somewhere it shouldn’t.
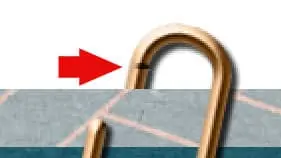
This usually happens because the area selected from the shadow wasn’t exactly the same as the area selected from the paperclip.
Fortunately, it’s easy to fix.
You can simply use the Eraser tool on the upper shadow layer to remove the unwanted piece.
If you want to keep the shadow pieces completely separate and movable, you can instead select the stray section, promote it to its own layer, move it down with the other shadow section, and then merge the two shadow pieces together.
The same idea works with other embellishments
Once you understand what we’re doing here, you aren’t limited to paperclips.
The same basic layer technique can be useful whenever you want a small element to appear as though it passes behind another element.
You could use it with staples, ribbons, brads, or similar embellishments.
Some elements will be easier than others. A simple paperclip with clearly separated sections gives you an obvious place to make your selection. Designs with overlapping or touching parts require more careful selections because it isn’t always obvious which pixels should remain in front and which should disappear behind the paper.
When you’re choosing an element for this type of effect, starting with a simple design can save you quite a bit of work.
A little layer management makes it believable
The trick to a convincing paperclip isn’t really the paperclip itself. It’s the way you divide the element and then use the Layers palette to put each piece where it belongs.
Once you stop thinking of the paperclip as one object and start treating it as several linked layers, you can make it appear to pass naturally behind your papers without permanently erasing anything.
And the same idea can be useful far beyond paperclips.
Want More PaintShop Pro Tutorials?
Scrapbook Campus is where you’ll find even more PaintShop Pro tutorials, classes, Master Classes, resources, and help. Whether you’re looking for a quick technique or want to explore a topic in more depth, there are plenty of step-by-step resources to help you get more from PaintShop Pro.
Visit Scrapbook Campus to discover more PaintShop Pro tutorials and resources.