PaintShop Pro has a unique feature: picture tubes. I am not sure at which version they started using tubes, but I know for a fact that version 4 had them, so it is definitely not new.
What are Picture Tubes?
For anyone who is not familiar with the basics of picture tubes, think of a roll of stickers: you can have a roll with all identical stickers, or a roll with several different stickers. Unlike brushes, the picture tubes are colored images by themselves, and you cannot change that, just like a sticker would have its own colors.
We hear the word “tube” often among PSP users, but it is not always referring to the same thing. Some PaintShop Pro users are specializing in extracting elements from an image to create a .png file they call “tubes”. You can use those kinds of “tubes” within almost any graphic program since they are not specific to PaintShop Pro. Although, I will not argue with that use of the word, let’s say that the picture tubes that are part of PSP refer to something more, and mostly use different features for more flexibility. Let’s have a look at what the Picture Tubes are when you are using them inside PaintShop Pro.
Picture Tubes come in three different types, each with its own specific use:
- as a single image to place as often as you want
- as a series of images that can be placed randomly
- a series of images placed directionally. Let’s see them all in a bit more detail.
Picture tubes that are single images
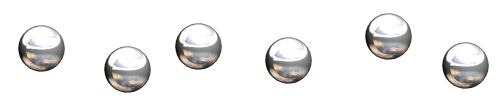
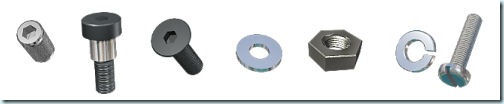
These kinds of images are doing exactly the same thing as if you had a single .png image, with a transparent background and you placed various copies of it on your work. You can have a star, an angel, a handprint, a toy locomotive, a flower, etc. There is no limit to what can be used as a single image. If you can extract it, you can use it as a tube. Here is an example of several repetitions of a single image tube.
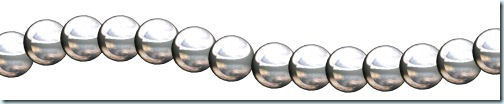
One thing you can do with tubes that is a bit different than with regular single images is the spacing. You can set the step and repeat the single image evenly along the way, either in a straight line or when you draw freehand, like this:
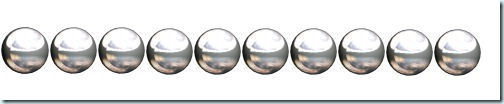
and you can also overlap them if you set a smaller step:
Notice that the single images are always placed in the exact same position, with no rotation, no size change, etc.
Picture tubes as series of images placed randomly
Another characteristic of tubes is the possibility of having several of them together (as if they were various images on the same roll of stickers). Some of them can have all different images and place images, one by one, randomly on each click. JASC and Corel have included several such tubes with the program. They are often grouped by type since it makes more sense. You can have several autumn leaves, or pink buttons, or grass blades when you place them. Here is an example of randomly picked images (each item is placed where I click but they are randomly selected):
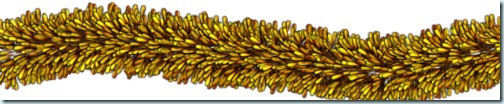
This type of picture tube is great if you want some randomly picked elements like a drawer full of nuts and bolts, or a tree full of autumn leaves. You don’t have to pick and choose which one will be printed next. You just have to click repeatedly, or even just “doodle” with the mouse, and various images will be placed. The randomness of this type of tube, combined with the adjustable step also lets you create elements like this garland (available in my store):
Picture tubes as series of images placed in a continuous manner
The previous uses of tubes are pretty simple and could be done with any set of .png images. However, the picture tube tool has even more potential when the images are created to be used in a continuous sequential manner. In this case, they tend to create something very different. The individual images are often just part of something and their sequential placement will create something else that is likely not obvious when looking at the individual images. As an example, here is a rope tube (a very versatile tool!).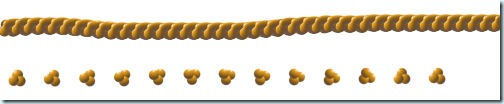
The top rope is the “finished” product with the default settings of a step of 1. On the bottom, I changed the step to 35 so you can see the individual image. Notice that each one is slightly different from the previous one so their sequential placement will create something else. Isn’t that neat? That is one of the most powerful characteristics of the PSP tubes.
Picture tubes as directional images
Well, this type of tube is my favorite and is, in my opinion, THE most powerful feature of the picture tube tool. How good they will look depends on how many different pictures you have. The tool will place the images according to the angle of movement of the mouse. And the tube file will include many different images, oriented differently. One image will be oriented straight up, the next one will be angled at 5 degrees, and the next one at 10 degrees, and so on. This will allow the pictures to seemingly follow the expected direction for it. Here is an example of a directional tube used:
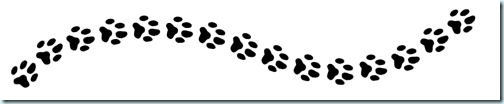
And that is how I created all my directional tubes to make ropes, chains, tire tracks, and zipper teeth!
So, if you didn’t know what picture tubes were all about, I hope this will help you a bit. If you are a PaintShop Pro user, play with them. As you can see, picture tubes are much much more than just transparent .png images with a different name! Picture tubes are fun to use, and so versatile. Since they come directly with your PSP, no need to purchase an outside plugin or such.
If you want to see how this powerful tool can be used, keep an eye on the next article.
Did you know about picture tubes? Did you ever use them? For more information on how each of those types of tubes can be used, check the other post on What can you do with Picture Tubes.
Do you want to learn even more tricks about Picture tubes? There are two full-length Master Classes available for you on this topic: Picture Tubes with PaintShop Pro and Tubes with Direction.
And you can find many Picture Tubes to play with, now that you know all that!